Event Seating Plan / diagram


Wonder if anyone can help, I recently attended an Events Training session where they showed us to how to create a the seating plan, I am certain they also showed us how to produce a graphic where you could move seats etc? I have created the seating plan but cannot find where i create the layout / floor plan. Is anyone able to help?
Comments
-
RE does have a seating module, though it is not with the “floor plan” layout. You can create sections and then tables in section (even down to the seat) and seat participant onto them. You can group guest first by seating groups, which then helps eventually seating them into the table configured.
There is no “visual” on how the section and table is lay out on the actual floor plan.
I do not believe RE NXT web view has anything new for this functionality either, nor are there any marketplace app to connect that gives you the ability for seating with visual layout.
The only “app” out there that has visual floor plan layout (doesn't integrate with RE NXT) is Social Table, but has been acquired by CVENT and has became quite expensive.
1 -
The seating chart wizard is what you want to use…..very intuitive.
The following is from a P&P document I created for our organization:
SECTION I – Seat Participants Using Event Seating Wizard
Setting up event seating is a two-step process that involves setting up the seating layout (the number of sections, tables, rows, etc...) and assigning the participants to the seats.
- Set up the seating layout
Note: If the seating layout has already been set up, skip these instructions and begin assigning participants to seats according to the instructions in Section II.
- Open the appropriate event. On the General tab, click the Seating button.
- The Event Seating Setup Wizard welcome screen appears. Click Next.
- The Seating Layout screen appears. To copy the seating layout from another event, click Copy from another Event. Otherwise, select the appropriate seating configuration from the following options:
- Sections, Tables, and Seats
- Sections, Rows, and Seats
- Sections and Seats
- Enter the number of sections, tables, rows, or seats in the corresponding fields. The fields available here depend on the option selected for the seating configuration. The total seating capacity updates automatically at the bottom of the screen based on the information entered. Click Next.
Note: The maximum total seating capacity is 25,000, which includes a maximum of 10 sections, 50 tables per section, and 50 seats per table.
- In the Sections screen, ensure that the seating layout is correct. If not, either manually correct it or click Previous and update the selections on the Seating Layout screen. For continuous numbering, mark the Use continuous numbering checkbox. Click Next. Repeat for the Tables, Rows, and Seats screens. (The screens that appear are determined by the seating layout selected in step 3.)
- Click Finish
Note: Section, tables, rows, and seats may be added, renamed, renumbered, or moved after this initial setup.
- Assign participants to seats
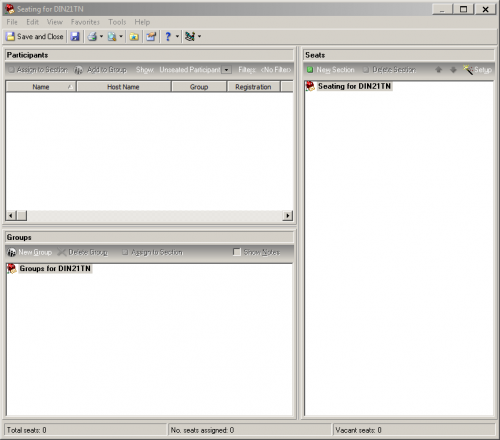
The Seating screen is divided into three frames:
- Participants - lists participants for whom the “Do not seat this Participant checkbox” is unmarked.
- Seats - reflects the design set up using the Seating Setup Wizard.
- Groups - allows grouping participants together for seating
To seat a participant, do one of the following:
- Automatically assign participants to seats. From the menu bar, select Tools, then Auto-Seating. The Auto-Seating screen appears. Click Auto-Seat. All participants are assigned automatically from the Groups and Participants frames to seats at tables, rows, or sections in the Seats frame. Click Save and Close on the toolbar.
- Drag and drop the participant's name from the Participants frame to the Seats frame. If you drop the participant on a seat, that's where they are seated. If you drop participant on a table, row, or section, they are automatically seated in the first available seat beneath your selection.
- To simultaneously seat multiple participants, press the Ctrl key, highlight the participants, and drag and drop them in the Seats frame. For obvious reasons, when dragging and dropping multiple participants, you can drop them only on a table, row, or section, not an individual seat.
- You can also seat individuals by clicking the Participants frame's Assign to toolbar button. The button's wording (Assign to Seat vs. Assign to Table) adjusts based on whether you've selected a seat, table, row, or section in the Seats frame.
- To seat participants in groups, click New Group in the Groups frame and enter a name when prompted. Drag and drop participants from the Participants frame to the new group or highlight the participant and the group and click the Participants frame's Add to Group toolbar button. To seat a group, drag and drop it from the Groups frame to the Seats frame.
- To seat a participant from the participant record, open the appropriate participant record. On the General tab, select Participant, Seating for this Event from the menu bar and assign the appropriate seat.
Note: To show participants that have not been assigned a seat only, from the Participants frame, click the down arrow in the Show: drop down menu and select Unseated Participants. The Total seats, No. seats assigned, and Vacant seats fields at the bottom of the Seating Assignments screen update automatically as seats are assigned.
- To change seating assignments: Once seated, you can drag and drop the participant to a different seat, if needed.
- To remove a participant from the Seats frame completely, right-click the participant's name and select Remove participant from seat from the menu.
SECTION II - Modify Event Seating After Completing Event Seating Wizard
If you have completed the Seating Wizard and seated your participants and later want to add tables or seats to tables, DO NOT go through the wizard again. This would erase the settings and seating assignments already made.
- Go to the Sections pane of the seating chart.
- Select a section to highlight it and then right click and select Add Table.
- To add seats to a table, select the table itself and right click, then select New Seat.
2


Categories
- All Categories
- Shannon parent
- shannon 2
- shannon 1
- 21 Advocacy DC Users Group
- 14 BBCRM PAG Discussions
- 89 High Education Program Advisory Group (HE PAG)
- 28 Luminate CRM DC Users Group
- 8 DC Luminate CRM Users Group
- Luminate PAG
- 5.9K Blackbaud Altru®
- 58 Blackbaud Award Management™ and Blackbaud Stewardship Management™
- 409 bbcon®
- 2K Blackbaud CRM™ and Blackbaud Internet Solutions™
- donorCentrics®
- 1.1K Blackbaud eTapestry®
- 2.8K Blackbaud Financial Edge NXT®
- 1.1K Blackbaud Grantmaking™
- 527 Education Management Solutions for Higher Education
- 1 JustGiving® from Blackbaud®
- 4.6K Education Management Solutions for K-12 Schools
- Blackbaud Luminate Online & Blackbaud TeamRaiser
- 16.4K Blackbaud Raiser's Edge NXT®
- 4.1K SKY Developer
- 547 ResearchPoint™
- 151 Blackbaud Tuition Management™
- 1 YourCause® from Blackbaud®
- 61 everydayhero
- 3 Campaign Ideas
- 58 General Discussion
- 115 Blackbaud ID
- 87 K-12 Blackbaud ID
- 6 Admin Console
- 949 Organizational Best Practices
- 353 The Tap (Just for Fun)
- 235 Blackbaud Community Feedback Forum
- 124 Ninja Secret Society
- 32 Blackbaud Raiser's Edge NXT® Receipting EAP
- 55 Admissions Event Management EAP
- 18 MobilePay Terminal + BBID Canada EAP
- 36 EAP for New Email Campaigns Experience in Blackbaud Luminate Online®
- 109 EAP for 360 Student Profile in Blackbaud Student Information System
- 41 EAP for Assessment Builder in Blackbaud Learning Management System™
- 9 Technical Preview for SKY API for Blackbaud CRM™ and Blackbaud Altru®
- 55 Community Advisory Group
- 46 Blackbaud Community Ideas
- 26 Blackbaud Community Challenges
- 7 Security Testing Forum
- 1.1K ARCHIVED FORUMS | Inactive and/or Completed EAPs
- 3 Blackbaud Staff Discussions
- 7.7K ARCHIVED FORUM CATEGORY [ID 304]
- 1 Blackbaud Partners Discussions
- 1 Blackbaud Giving Search™
- 35 EAP Student Assignment Details and Assignment Center
- 39 EAP Core - Roles and Tasks
- 59 Blackbaud Community All-Stars Discussions
- 20 Blackbaud Raiser's Edge NXT® Online Giving EAP
- Diocesan Blackbaud Raiser’s Edge NXT® User’s Group
- 2 Blackbaud Consultant’s Community
- 43 End of Term Grade Entry EAP
- 92 EAP for Query in Blackbaud Raiser's Edge NXT®
- 38 Standard Reports for Blackbaud Raiser's Edge NXT® EAP
- 12 Payments Assistant for Blackbaud Financial Edge NXT® EAP
- 6 Ask an All Star (Austen Brown)
- 8 Ask an All-Star Alex Wong (Blackbaud Raiser's Edge NXT®)
- 1 Ask an All-Star Alex Wong (Blackbaud Financial Edge NXT®)
- 6 Ask an All-Star (Christine Robertson)
- 21 Ask an Expert (Anthony Gallo)
- Blackbaud Francophone Group
- 22 Ask an Expert (David Springer)
- 4 Raiser's Edge NXT PowerUp Challenge #1 (Query)
- 6 Ask an All-Star Sunshine Reinken Watson and Carlene Johnson
- 4 Raiser's Edge NXT PowerUp Challenge: Events
- 14 Ask an All-Star (Elizabeth Johnson)
- 7 Ask an Expert (Stephen Churchill)
- 2025 ARCHIVED FORUM POSTS
- 322 ARCHIVED | Financial Edge® Tips and Tricks
- 164 ARCHIVED | Raiser's Edge® Blog
- 300 ARCHIVED | Raiser's Edge® Blog
- 441 ARCHIVED | Blackbaud Altru® Tips and Tricks
- 66 ARCHIVED | Blackbaud NetCommunity™ Blog
- 211 ARCHIVED | Blackbaud Target Analytics® Tips and Tricks
- 47 Blackbaud CRM Higher Ed Product Advisory Group (HE PAG)
- Luminate CRM DC Users Group
- 225 ARCHIVED | Blackbaud eTapestry® Tips and Tricks
- 1 Blackbaud eTapestry® Know How Blog
- 19 Blackbaud CRM Product Advisory Group (BBCRM PAG)
- 1 Blackbaud K-12 Education Solutions™ Blog
- 280 ARCHIVED | Mixed Community Announcements
- 3 ARCHIVED | Blackbaud Corporations™ & Blackbaud Foundations™ Hosting Status
- 1 npEngage
- 24 ARCHIVED | K-12 Announcements
- 15 ARCHIVED | FIMS Host*Net Hosting Status
- 23 ARCHIVED | Blackbaud Outcomes & Online Applications (IGAM) Hosting Status
- 22 ARCHIVED | Blackbaud DonorCentral Hosting Status
- 14 ARCHIVED | Blackbaud Grantmaking™ UK Hosting Status
- 117 ARCHIVED | Blackbaud CRM™ and Blackbaud Internet Solutions™ Announcements
- 50 Blackbaud NetCommunity™ Blog
- 169 ARCHIVED | Blackbaud Grantmaking™ Tips and Tricks
- Advocacy DC Users Group
- 718 Community News
- Blackbaud Altru® Hosting Status
- 104 ARCHIVED | Member Spotlight
- 145 ARCHIVED | Hosting Blog
- 149 JustGiving® from Blackbaud® Blog
- 97 ARCHIVED | bbcon® Blogs
- 19 ARCHIVED | Blackbaud Luminate CRM™ Announcements
- 161 Luminate Advocacy News
- 187 Organizational Best Practices Blog
- 67 everydayhero Blog
- 52 Blackbaud SKY® Reporting Announcements
- 17 ARCHIVED | Blackbaud SKY® Reporting for K-12 Announcements
- 3 Luminate Online Product Advisory Group (LO PAG)
- 81 ARCHIVED | JustGiving® from Blackbaud® Tips and Tricks
- 1 ARCHIVED | K-12 Conference Blog
- Blackbaud Church Management™ Announcements
- ARCHIVED | Blackbaud Award Management™ and Blackbaud Stewardship Management™ Announcements
- 1 Blackbaud Peer-to-Peer Fundraising™, Powered by JustGiving® Blogs
- 39 Tips, Tricks, and Timesavers!
- 56 Blackbaud Church Management™ Resources
- 154 Blackbaud Church Management™ Announcements
- 1 ARCHIVED | Blackbaud Church Management™ Tips and Tricks
- 11 ARCHIVED | Blackbaud Higher Education Solutions™ Announcements
- 7 ARCHIVED | Blackbaud Guided Fundraising™ Blog
- 2 Blackbaud Fundraiser Performance Management™ Blog
- 9 Foundations Events and Content
- 14 ARCHIVED | Blog Posts
- 2 ARCHIVED | Blackbaud FIMS™ Announcement and Tips
- 59 Blackbaud Partner Announcements
- 10 ARCHIVED | Blackbaud Impact Edge™ EAP Blogs
- 1 Community Help Blogs
- Diocesan Blackbaud Raiser’s Edge NXT® Users' Group
- Blackbaud Consultant’s Community
- Blackbaud Francophone Group
- 1 BLOG ARCHIVE CATEGORY
- Blackbaud Community™ Discussions
- 8.3K Blackbaud Luminate Online® & Blackbaud TeamRaiser® Discussions
- 5.7K Jobs Board