4 Ways to Spruce up Your Notification Tables


Notifications through a Power Automate flow are a great way to let your front-end users know about new additions, upcoming actions, or areas they should pay attention to. With a few additional steps, you can improve the digest tables within your notifications flow. Transform the look from a simple table (as in the “before” image) to a richer experience that provides clearly structured information and links that let users access data directly (see the “after” image). Here are four ways to spruce up your notification tables:
- Add Hyperlinks
- Format Amounts
- Format Dates
- Add Style and Color
BEFORE

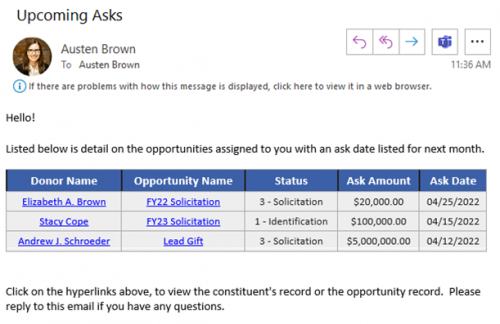
AFTER

Open your favorite notification flow and follow along! I used the Upcoming Opportunity Notification Flow available within the Template Showcase.
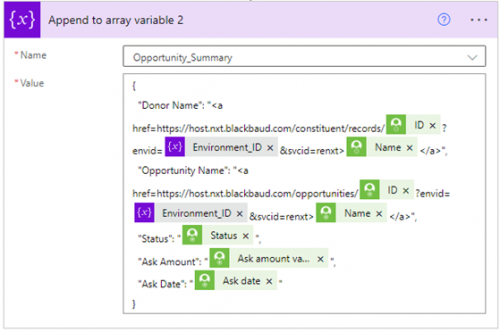
1. Add Hyperlinks
To make it easy for the recipients of your notification digests to access records referenced in the table, add dynamic hyperlinks to your append array variable. Simply note the URL for a specific record type when accessing it through Web View. Use this format for a constituent record URL:
https://host.nxt.blackbaud.com/constituent/records/[Constituent System ID]?envid=[Environment ID]&svcid=renxt
Using available dynamic content available through your Power Automate flow, and a pre-set string variable for Environment ID, set-up a <a> href HTML attribute to create the dynamic hyperlink/s within your notification table. Check out the screenshot below for how you can update your Append to array variable action with this addition.
Updated Append Array Variable with HTML Hyperlinks Added
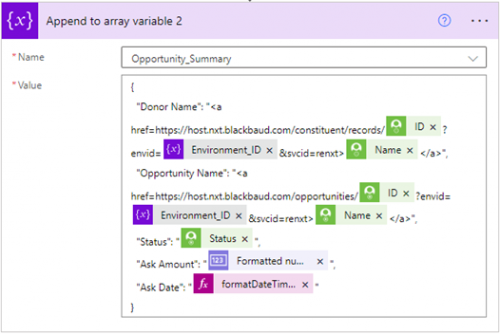
2. Format Amounts
There is a free action within Power Automate that can format dynamic amount values called “Format number”. Simply add this action above where you need a formatted number to appear; place your dynamic amount value in the “Number” field and select your preferred formatting from the drop-down provided. In the append array variable action, replace your previously listed “amount value” with the output of the Format number action.
Updated Append Array Variable with Format Number Output Added

3. Format Dates
Use an expression (the second tab within your dynamic content window) to enter in a specific function to standardize how dates appear within the digest table. This makes them much more legible to notification recipients and easier to understand.
The function “formatDateTime” lets you update a static or dynamic date within your flow. See the instructions below to use this function with dynamic content:
- Remove your dynamic date from the append array variable and place your cursor within the available spot.
- Go to the dynamic content window, and select the Expression tab.
- Start typing out “formatDateTime” in the available space and enter an open parenthesis directly after the function text.
- Place your cursor between the parenthesis and select the dynamic date field from the “Dynamic Content” tab.
- Next place your cursor directly before the final close parenthesis and add “, ‘MM/dd/yyyy’” Your final function should look like this:
formatDateTime(outputs(‘[Dynamic Field]’)?['body/ask_date'], 'MM/dd/yyyy')
- Finally, confirm that your cursor has remained in the final spot you want your date to appear within your append array variable, and click “OK.”
Updated Append Array Variable with Format Date Expression Added
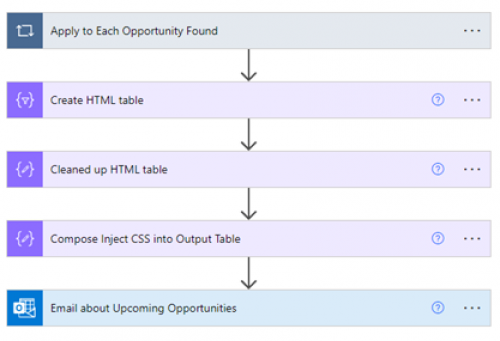
4. Add Style and Color
Using a free tool to generate CSS for a HTML table along with a Compose action, lets you add style and color to your HTML table. Think of all the possibilities! I like to style my tables according to my Org’s branding guidelines for fonts and colors. Here is how to do it!
- Follow the link above and customize a template with the various elements of how you want your HTML table to appear in the notification. When you are happy with the results, copy the generated CSS code.
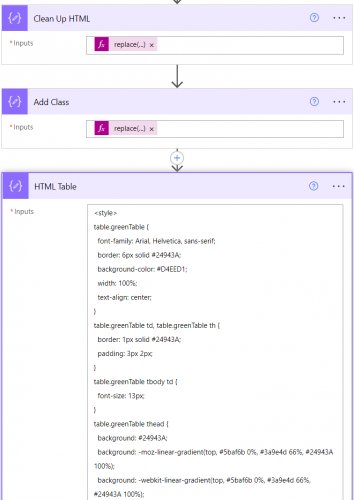
- Back in your flow, add a Compose action after the action above your Send an email action. Within the Inputs of the Compose enter in the following:
<style>
[Copied CSS Code]
</style>
[Output from the Data Operation action directly above]
- Finally, replace the Output listed within your Email Notification to be the Output from the step to inject CSS into your HTML table.
Here's the Result!
Stacy Cope and I will be presenting a series of three Skills Labs at Blackbaud Developers’ Conference June 7-9, 2022! Our sessions are designed to help beginners get started using Microsoft Power Automate with Blackbaud Raiser’s Edge NXT. You’ll learn how to set up creative and useful custom workflows that save you time and enhance your work. Register today! We hope to see you there!
Check out our earlier posts for more information on how to get started with Power Automate, how Power Automate can help your organization, and how to utilize System Record IDs to bring dynamic content into your flow!
Comments
-
Simple and effective! Thanks, @Austen Brown, I'll be using this.
1 -
@Austen Brown does this work for us Gmail users out there? Last time I remember trying it did not work?
1 -
Dan, CSS support can be flakey across different email clients, but most support simple CSS styling. Gmail says they support CSS in emails, but ultimately it's going to depend on which CSS properties you use, and whether those specific properties are supported by the specific email client you're sending to.
The general rule of thumb is to keep your CSS as simple as possible, have a decent fallback in case the email client doesn't support one of your properties, and only use inline CSS (Austen's example here is inline).
2 -
@Dan Snyder, I finally got around to using this table formatting method in a flow today, and learned a few things. The HTML Table tool that Austen links to provides CSS that is intended to apply only to table elements of a specific class. But because the table HTML generated by Power Automate does not have any classes assigned, Gmail (or any other email client) will not apply the CSS to your HTML table.
The easiest way to fix this is to use the replace() function to add the class to your table element. Luckily, the site Austen linked to just applies the class to the table tag, so you only have to replace one thing. In the CSS, look towards the top where it will say something like this:
table.minimalistBlack {
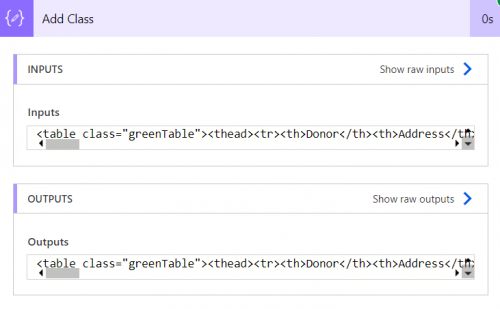
This means that your table element needs to be part of the minimalistBlack class. You can add that to your table HTML with a replace() function like this:
replace(outputs('Compose'),'<table>', '<table class="minimalistBlack">')
Of course, change “outputs('Compose')” to whatever action output contains your table HTML.
Once I did this, the table formatting was applied in gmail and the other email clients I tested.
1 -
@Ben Regier
Can you help me with this? Feel like I am missing one thing… The first ‘replace’ just cleans up the table…replace(replace(body('Create_HTML_Table'), '<', '<'), '>', '>')…while the second ‘replace’ makes the changes you suggest…replace(outputs('Clean_Up_HTML'),'<table>', '<table class="greenTable">'). What am I missing? ThanksBob
 0
0 -
@Bob Rickards and @Ben Regier I am getting the same result and I even put all the replace items in one compose and still no formatting?
0 -
Have you checked the outputs of your compose action to be sure that the class is being added to the table tag?
Also double check that your email is using the output from the right action.
0 -
Yep…here is the output:
And I checked the email and I am selecting the right output.
Thanks again for helping.
Bob
0 -
@Bob Rickards
I don't see any style tags or CSS in the output. Are you adding that somewhere else?0 -
@Ben Regier
Yes..I create the table, clean up the table, add the class and the add the CSS style. Is this the wrong order?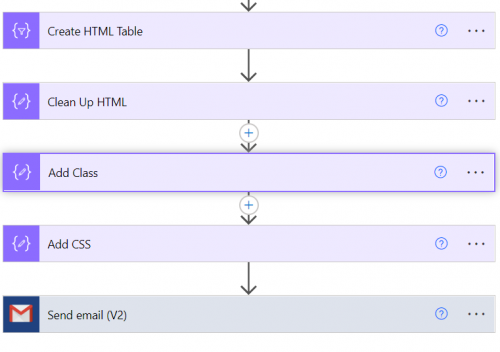 0
0 -
Order should be fine as long as everything is getting passed to the Send email action.
When you created your Send Email action, did you change to Code View before inserting your dynamic content? The code view button looks like this:

Click that button, delete any HTML tags that you find there, and then insert the dynamic content that contains your CSS and HTML code. Run a test, and view the results of the Send Email action to make sure the style tags, CSS, and HTML tags with the proper table class are coming through.
This is working in my tests.
0 -
@Ben Regier Would it be possible to share your test flow with us? I have tried many different iterations and have gotten the code in as I believe you outlined here, but still not getting a formatted table?
Could it have something to do with the links?
0 -
Yeah…I have checked everything and even rechecked and it is still not working. It has to be one of my compose statements is not working. Can you share your test flow?
0 -
I think it would be easier to troubleshoot if I can see the code in the body of the message that Gmail is sending out. The flow I'm using is quite different from Austen's example, but as long as the HTML and CSS are communicating the concept should be the same.
If you are willing, please go into your run history and copy everything in the Body field of your Gmail “Send email” action. Remove any confidential information and then either paste the code here, or send it to me directly.
 0
0 -
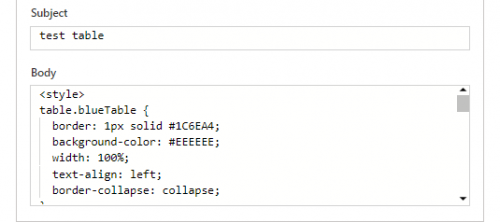
Nothing secretive about what I am sending….
<!--td {border: 1px solid #ccc;}br {mso-data-placement:same-cell;}-->
<style>
table.blueTable {
border: 1px solid #1C6EA4;
background-color: #EEEEEE;
width: 100%;
text-align: left;
border-collapse: collapse;
}
table.blueTable td, table.blueTable th {
border: 1px solid #AAAAAA;
padding: 3px 2px;
}
table.blueTable tbody td {
font-size: 13px;
}
table.blueTable tr:nth-child(even) {
background: #D0E4F5;
}
table.blueTable thead {
background: #1C6EA4;
background: -moz-linear-gradient(top, #5592bb 0%, #327cad 66%, #1C6EA4 100%);
background: -webkit-linear-gradient(top, #5592bb 0%, #327cad 66%, #1C6EA4 100%);
background: linear-gradient(to bottom, #5592bb 0%, #327cad 66%, #1C6EA4 100%);
border-bottom: 2px solid #444444;
}
table.blueTable thead th {
font-size: 15px;
font-weight: bold;
color: #FFFFFF;
border-left: 2px solid #D0E4F5;
}
table.blueTable thead th:first-child {
border-left: none;
}table.blueTable tfoot {
font-size: 14px;
font-weight: bold;
color: #FFFFFF;
background: #D0E4F5;
background: -moz-linear-gradient(top, #dcebf7 0%, #d4e6f6 66%, #D0E4F5 100%);
background: -webkit-linear-gradient(top, #dcebf7 0%, #d4e6f6 66%, #D0E4F5 100%);
background: linear-gradient(to bottom, #dcebf7 0%, #d4e6f6 66%, #D0E4F5 100%);
border-top: 2px solid #444444;
}
table.blueTable tfoot td {
font-size: 14px;
}
table.blueTable tfoot .links {
text-align: right;
}
table.blueTable tfoot .links a{
display: inline-block;
background: #1C6EA4;
color: #FFFFFF;
padding: 2px 8px;
border-radius: 5px;
}
</style><table class="blueTable"><thead><tr><th>Donor</th><th>Address</th><th>Gift Type</th><th>Amount</th><th>Fund</th><th>Soft Credit</th></tr></thead><tbody><tr><td>Mr. Xxxxxxxxx</td><td> |411 XXXXXXXXX- Wilmette - IL - 60091-2363| </td><td>| Donation</td><td> | $80.00</td><td>| Athletics - Women's Soccer Fund</td><td>| </td></tr></tbody></table>
<br>
We are fortunate to know this process will allow our donors to hear from faculty, staff, and/or students that their gift makes a difference!<br>
<strong>REMINDER…these funds need to be spent during the current fiscal year.<br>
</strong><br>
If you have any questions please contact me at x3294.<br>
<br>
Thank you!<br>
Amanda Beck<br>
Stewardship and Engagement Manager</p>0 -
Thanks, this is helpful. I ran some tests and was interested to find out that the code you posted will work as expected when sent from Outlook to Gmail, or from Gmail to Outlook. But for some reason, it does NOT work when sent from Gmail to Gmail.
However, there is a solution. If you include <html> and <head> blocks, it will work in Gmail as well. Here's how your code should look: (I removed the “<!--td {border: 1px solid #ccc;}br {mso-data-placement:same-cell;}-->” tag because I don't think it's doing anything.)
<html>
<head>
<style>
table.blueTable {
border: 1px solid #1C6EA4;
background-color: #EEEEEE;
width: 100%;
text-align: left;
border-collapse: collapse;
}
table.blueTable td, table.blueTable th {
border: 1px solid #AAAAAA;
padding: 3px 2px;
}
table.blueTable tbody td {
font-size: 13px;
}
table.blueTable tr:nth-child(even) {
background: #D0E4F5;
}
table.blueTable thead {
background: #1C6EA4;
background: -moz-linear-gradient(top, #5592bb 0%, #327cad 66%, #1C6EA4 100%);
background: -webkit-linear-gradient(top, #5592bb 0%, #327cad 66%, #1C6EA4 100%);
background: linear-gradient(to bottom, #5592bb 0%, #327cad 66%, #1C6EA4 100%);
border-bottom: 2px solid #444444;
}
table.blueTable thead th {
font-size: 15px;
font-weight: bold;
color: #FFFFFF;
border-left: 2px solid #D0E4F5;
}
table.blueTable thead th:first-child {
border-left: none;
}table.blueTable tfoot {
font-size: 14px;
font-weight: bold;
color: #FFFFFF;
background: #D0E4F5;
background: -moz-linear-gradient(top, #dcebf7 0%, #d4e6f6 66%, #D0E4F5 100%);
background: -webkit-linear-gradient(top, #dcebf7 0%, #d4e6f6 66%, #D0E4F5 100%);
background: linear-gradient(to bottom, #dcebf7 0%, #d4e6f6 66%, #D0E4F5 100%);
border-top: 2px solid #444444;
}
table.blueTable tfoot td {
font-size: 14px;
}
table.blueTable tfoot .links {
text-align: right;
}
table.blueTable tfoot .links a{
display: inline-block;
background: #1C6EA4;
color: #FFFFFF;
padding: 2px 8px;
border-radius: 5px;
}
</style>
</head>
<table class="blueTable"><thead><tr><th>Donor</th><th>Address</th><th>Gift Type</th><th>Amount</th><th>Fund</th><th>Soft Credit</th></tr></thead><tbody><tr><td>Mr. Xxxxxxxxx</td><td> |411 XXXXXXXXX- Wilmette - IL - 60091-2363| </td><td>| Donation</td><td> | $80.00</td><td>| Athletics - Women's Soccer Fund</td><td>| </td></tr></tbody></table><br>
We are fortunate to know this process will allow our donors to hear from faculty, staff, and/or students that their gift makes a difference!<br>
<strong>REMINDER…these funds need to be spent during the current fiscal year.<br>
</strong><br>
If you have any questions please contact me at x3294.<br>
<br>
Thank you!<br>
Amanda Beck<br>
Stewardship and Engagement Manager</p>
</html>2 -
That did it, thanks @Ben Regier!
1 -
That worked!! Thanks so much for helping…this was really bugging me and you just help me solve the problem. Appreciate it!!
0 -
@Austen Brown Can you tell us what is in your Environment_ID formula from the Constituent URL? I'm not sure where I should stop copying in the link. Thank you.
0 -
0
-
@Austen Brown Thank you for this post! It has been a huge help, and I love the ability to use NXT hyperlinks for donor records, gift records, and acknowledgement letter attachments. But there is one column (Gift Solicitor Name) that I have been unable to use with hyperlinks-- is this because there can be multiple solicitors per gift? Is it possible to export “Solicitor Name(s)” for each gift to be used in a hyperlink/column in an email table? Thank you!
 0
0 -
@Brenda Gutierrez
Since a single gift can have more than one gift solicitor and potentially different amount being solicited by different solicitor, you will need to use a string variable to “append” additional solicitor info.Assuming you want the table to show:
Gift Date Gift Amount Gift Solicitor(s) 1/1/2024 $1,500.00 John Smith $1,000
Mary Jones $5002/1/2024 $800.00 - Initialize an array variable (i.e. Gift Solicitor)
- inside the loop that loops the list of gift records, you will need to have another loop that loops the list of fundraisers
- using the Fundraisers fundraiser ID, you will call the Get Constituent action to get the constituent info on the fundraiser.
- Then you will append to the array variable (Gift Solicitor):
<a href=https://host.nxt.blackbaud.com/constituent/records/@{Fundraisers fundraiser ID@}>@{constituent name of the fundraiser@}</a> @{formatNumber(Fundraisers amount value, 'c')}
- in the action that you add the gift and various information of the gift into an object, you will have
“Gift Solicitor(s)”: @{join(variables('Gift Solicitor'), ‘<br>’)}, - As the last action in the loop that loops the list of gift record, you will need to reset the array variable by using Set Variable action and set the Gift Solicitor variable to []
in the above, there are some places where I bolded, you will need to get the dynamic content that is associated to your flow, don't just copy my text.
1 -
@Chris Zello
Unless you have access to more than 1 environment (a test environment and a production environment) of RE NXT, you don't really need to append the envid=x-xxxxxxxxxxxxxxxxxxxxxx in the URL0 -
@Alex Wong Thank you so much for this detailed information! I was able to add this field successfully after fixing an apply to loop issue using your instructions ? Thanks again.
0 -
@Ben Regier
i agree with you?0


Categories
- All Categories
- 6 Blackbaud Community Help
- High Education Program Advisory Group (HE PAG)
- BBCRM PAG Discussions
- Luminate CRM DC Users Group
- DC Luminate CRM Users Group
- Luminate PAG
- 186 bbcon®
- 1.4K Blackbaud Altru®
- 389 Blackbaud Award Management™ and Blackbaud Stewardship Management™
- 1K Blackbaud CRM™ and Blackbaud Internet Solutions™
- 14 donorCentrics®
- 355 Blackbaud eTapestry®
- 2.4K Blackbaud Financial Edge NXT®
- 616 Blackbaud Grantmaking™
- 542 Blackbaud Education Management Solutions for Higher Education
- 33 Blackbaud Impact Edge™
- 3.1K Blackbaud Education Management Solutions for K-12 Schools
- 909 Blackbaud Luminate Online® and Blackbaud TeamRaiser®
- 207 JustGiving® from Blackbaud®
- 6.2K Blackbaud Raiser's Edge NXT®
- 3.5K SKY Developer
- 236 ResearchPoint™
- 116 Blackbaud Tuition Management™
- 375 YourCause® from Blackbaud®
- 160 Organizational Best Practices
- 232 The Tap (Just for Fun)
- 31 Blackbaud Community Challenges
- Blackbaud Consultant’s Community
- 19 PowerUp Challenges
- 3 Raiser's Edge NXT PowerUp Challenge: Gift Management
- 4 Raiser's Edge NXT PowerUp Challenge: Events
- 3 Raiser's Edge NXT PowerUp Challenge: Home Page
- 4 Raiser's Edge NXT PowerUp Challenge: Standard Reports
- 4 Raiser's Edge NXT PowerUp Challenge #1 (Query)
- 71 Blackbaud Community All-Stars Discussions
- 47 Blackbaud CRM Higher Ed Product Advisory Group (HE PAG)
- 743 Community News
- 2.8K Jobs Board
- Community Help Blogs
- 52 Blackbaud SKY® Reporting Announcements
- Blackbaud Consultant’s Community
- 19 Blackbaud CRM Product Advisory Group (BBCRM PAG)
- Blackbaud Francophone Group
- Blackbaud Community™ Discussions
- Blackbaud Francophone Group