Sharing my Power Automate Flow: Merging Labels in Word


Summary:
Merging Labels along with Letters. The Letters portion could be modified as needed for acknowledgements, generic newsletters, reminders, etc.
Required Connections:
- SharePoint
- SFTP
- Encodian (optional - needed for the letters merge, but not needed to merge labels)
- Blackbaud Raisers Edge NXT Connector (optional - could be replaced by only using an export file if nothing needs to be written back to RENXT)
- Blackbaud Raisers Edge NXT queue (optional - this flow assumes an automated export file will be created from RENXT which requires the queue module. Could be replaced by using the RENXT Connector depending on needed field requirements)
- Word Online (Business) Connection
- Office 365 Outlook (optional - could be replaced by a different email provider or could be left off if no email notifications are needed)
Skill Level:
Intermediate
Flow Configuration Needs:
Update Flow
1 - Update the Recurrence and schedule when the flow should occur. The Automated Flow will launch based on this schedule.
2 - Update 'Convert time zone-RunDate' to the correct time zone (default is Eastern time zone).
3 - Update the 'Initialize variable - RecipientEmail' variable to the email address for who should be notified when the process completes.
4 - Update the 'Initialize variable - FTPFilePath' variable to reflect the location of your exported document.
5 - Optional - Update the language 'Send an email (V2) - No Letters Today'.
6 - Update the 'Create file - Exported file' action to point to your SharePoint folder.
a - The beginning of the file name may also be updated to be relevant to your export file.
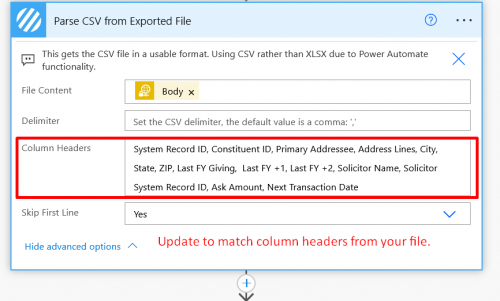
7 - Update 'Parse CSV from Exported File' to reflect the Headers in your export file.
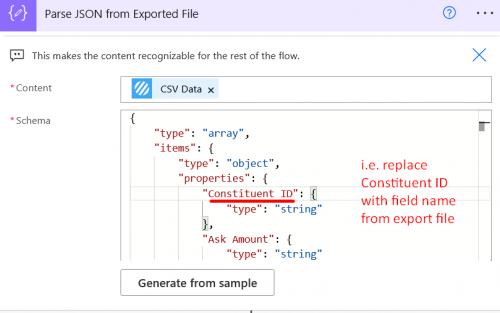
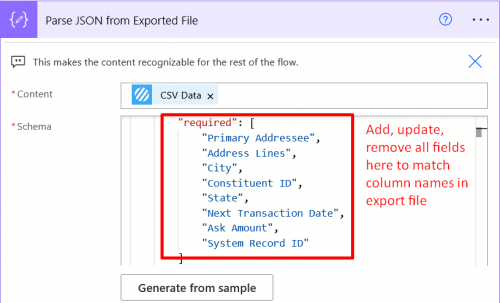
8 - Update 'Parse JSON from Exported File' to reflect the Headers in your export file.
a - Update, add and delete fields within the Properties section to reflect the fields in your export file.
b - Update, add and delete all fields within the Required section to reflect the fields in your export file.
9 - Update 'Select - Labels Template Array':
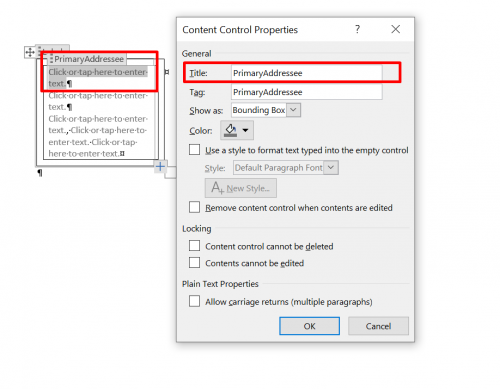
a - The values in the first column should match the title of the Content Control fields in the Word template.
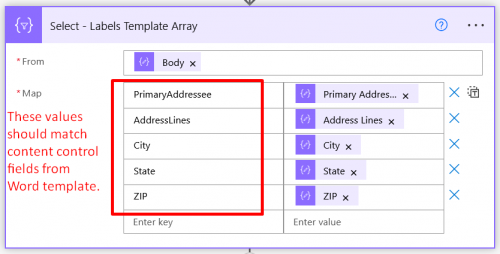
b - The values in the second column should be updated based on the Parse JSON output from your export file.
10 - Update 'Populate a Microsoft Word template - Labels' to point to your Word template for Labels from your SharePoint site.
a - The labels field should not need to be changed here.
11 - Update 'Populate a Microsoft Word template - Labels' to point to the SharePoint location where you want to store the files.
12 - Update 'Populate a Microsoft Word template - Letter' within 'Apply to each - Letters' to point to your Word template for the Letters from your SharePoint site.
a - Update the fields to map from either your RENXT connection or JSON output from the exported file.
13 - Update 'Create file - Letter' within 'Apply to each - Letters' to point to your SharePoint location.
14 - Update 'Create a constituent action' within 'Apply to each - Letters' to create the relevant data to add as an action in RENXT.
a - Optionally, delete this step if an action does not need to be created.
15 - Update 'Save Print-ready file to SharePoint' to point to your SharePoint location.
16 - Optional - Update the language in 'Send an email (V2) - Letters ready'.
Update Word Template
- Template Layout:
- This template is based on having three columns of labels, where cells are 1" high and 2.63" wide.
- If your labels have more or less columns, then update the columns in the layout of the file. (Layout > Columns>
- If the size of the labels is different, update the table properties. (Right click on the table and choose Table Properties. Navigate to the Row and Column tabs and update accordingly.)
- Note: If you are unsure what size the cells are for your labels, you can create a new Word document and go to Mailings > Labels > Options. Then choose the appropriate Label vendor and product number, click OK, and then click New Document. In the new document that is created, right-click into the first cell and choose Table Properties, and then check the Row and Column tabs. The values here are what should be set within your template and then you can modify as needed for spacing and other formatting needs.
- To add or remove field values from the label, refer to Update content controls.
Categories
- All Categories
- 6 Blackbaud Community Help
- High Education Program Advisory Group (HE PAG)
- BBCRM PAG Discussions
- Luminate CRM DC Users Group
- DC Luminate CRM Users Group
- Luminate PAG
- 186 bbcon®
- 1.4K Blackbaud Altru®
- 389 Blackbaud Award Management™ and Blackbaud Stewardship Management™
- 1K Blackbaud CRM™ and Blackbaud Internet Solutions™
- 14 donorCentrics®
- 355 Blackbaud eTapestry®
- 2.4K Blackbaud Financial Edge NXT®
- 616 Blackbaud Grantmaking™
- 542 Blackbaud Education Management Solutions for Higher Education
- 33 Blackbaud Impact Edge™
- 3.1K Blackbaud Education Management Solutions for K-12 Schools
- 909 Blackbaud Luminate Online® and Blackbaud TeamRaiser®
- 207 JustGiving® from Blackbaud®
- 6.2K Blackbaud Raiser's Edge NXT®
- 3.5K SKY Developer
- 236 ResearchPoint™
- 116 Blackbaud Tuition Management™
- 375 YourCause® from Blackbaud®
- 160 Organizational Best Practices
- 232 The Tap (Just for Fun)
- 31 Blackbaud Community Challenges
- Blackbaud Consultant’s Community
- 19 PowerUp Challenges
- 3 Raiser's Edge NXT PowerUp Challenge: Gift Management
- 4 Raiser's Edge NXT PowerUp Challenge: Events
- 3 Raiser's Edge NXT PowerUp Challenge: Home Page
- 4 Raiser's Edge NXT PowerUp Challenge: Standard Reports
- 4 Raiser's Edge NXT PowerUp Challenge #1 (Query)
- 71 Blackbaud Community All-Stars Discussions
- 47 Blackbaud CRM Higher Ed Product Advisory Group (HE PAG)
- 743 Community News
- 2.8K Jobs Board
- Community Help Blogs
- 52 Blackbaud SKY® Reporting Announcements
- Blackbaud Consultant’s Community
- 19 Blackbaud CRM Product Advisory Group (BBCRM PAG)
- Blackbaud Francophone Group
- Blackbaud Community™ Discussions
- Blackbaud Francophone Group